

Overview:

Hardware Used:
Software Used:
- Arduino IDE
Application Discussion:
The Arduino password-based door lock is a simple DIY home automation project. This is an easy project that could be applied in home security, item safe, door locks, and more.
The 4x4 Keypad
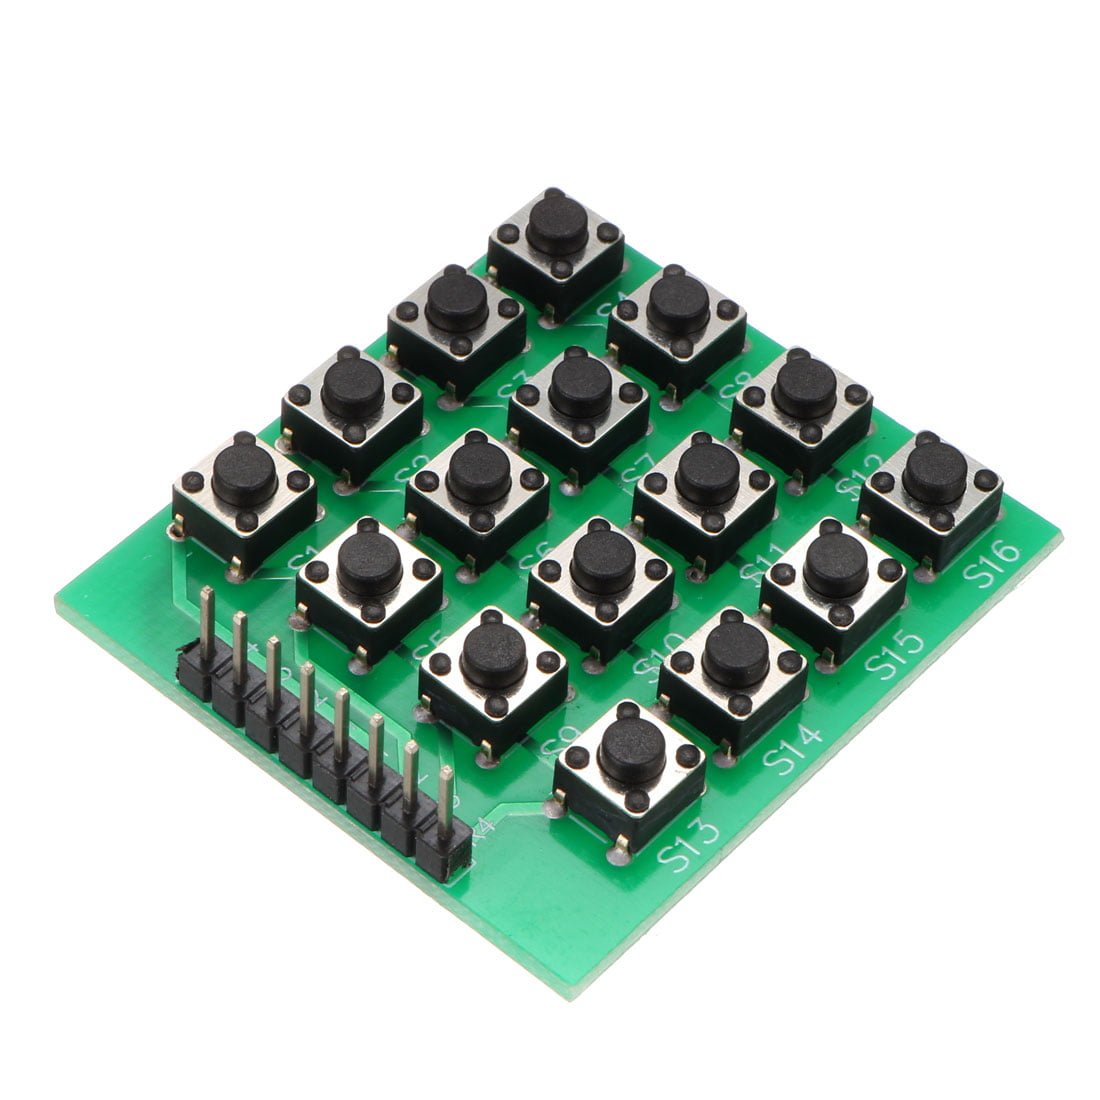
The 4x4 matrix keypad is a component that has 16 tact switches that are arranged in four rows and four columns. It has 8 output pins that describes the switch pressed based on row and column number.
This is a great alternative from using sixteen individual tact switches because the use of GPIO pins are halved.
The keypad in this project has the following format:
[1][2][3][A]
[4][5][6][B]
[7][8][9][C]
[*][0][#][D]
Where the * is Clear and the # is Submit.
SG90 Servomotor

The SG90 servomotor is a DC motor that could be programmed to an accurate angular or linear position. This specific servomotor could be programmed to move from 0 to 180 degrees.
It is always advisable to put the DC motor on a PWM pin (the pins with the ~ mark) to have full access to all angular position (from 0 to 180).
Servomotor pinout is as follows:
| Servomotor | Arduino |
| Orange | PWM Pin |
| Red | 5V |
| Brown | GND |
*PWM Pin is any pin labeled with ~ on the Arduino Uno Board (3, 5, 6, 9, 10, 11)
Driving a 7-Segment Display 4-Digit Display Tube

The 4-Digit 7-Segment Display has 32 LEDS that is structured to form 4 different digits with decimal points using only 12 pins. The 4-Digit 7-Segment Display in the Upgraded Arduino Kit has the common anode configuration. This means that the digit pins are to be connected to the arduino pins and the segment pins are to be powered by the 74HC595 output pins.
To drive the display properly, the following pins should be connected:
 |
|

|
|
*make sure to connect the Digit Pins in series with 330 Ohms resistor before connecting to Arduino
Hardware Setup:
This is the breadboard configuration of the system. All parts are included in the Arduino Upgraded Starter Kit.

Software Setup:
Make sure to download the following libraries to your Arduino IDE before applying code:
Open the Arduino IDE and upload the code on the Arduino Uno Board.
Code:
#include <Keypad.h>
#include <Servo.h>
#include <SevSegShift.h>

#define SHIFT_PIN_SHCP 6
#define SHIFT_PIN_STCP 5
#define SHIFT_PIN_DS   4

SevSegShift sevseg(SHIFT_PIN_DS, SHIFT_PIN_SHCP, SHIFT_PIN_STCP, 1, true);
Servo myservo;

const byte rows=4;
const byte cols=4;
char key[rows][cols]={
{'1','2','3','A'},
{'4','5','6','B'},
{'7','8','9','C'},
{'*','0','#','D'}
};

byte rowPins[rows]={2,A1,A5,A4};
byte colPins[cols]={A3,7,8,13};

Keypad customKeypad= Keypad(makeKeymap(key),rowPins,colPins,rows,cols);

int buzz = A2;

char setPassword[5] = "01BA";
char keyNum[5];
String addKey;

int openSeconds = 10000; //door stays unlocked for 10 seconds

void setup() {
  byte numDigits = 4;
  byte digitPins[] = {12, 11, 10, 9}; // These are the PINS of the ** Arduino **
  byte segmentPins[] = {0, 1, 2, 3, 4, 5, 6, 7}; // these are the PINs of the ** Shift register **
  bool resistorsOnSegments = false; // 'false' means resistors are on digit pins
  byte hardwareConfig = COMMON_ANODE; // See README.md for options
  bool updateWithDelays = false; // Default 'false' is Recommended
  bool leadingZeros = true; // Use 'true' if you'd like to keep the leading zeros
  bool disableDecPoint = false; // Use 'true' if your decimal point doesn't exist or isn't connected

  sevseg.begin(hardwareConfig, numDigits, digitPins, segmentPins, resistorsOnSegments, updateWithDelays, leadingZeros, disableDecPoint);
  sevseg.setBrightness(100);

  myservo.attach(3);
  clearSevDisplay();

  pinMode(buzz, OUTPUT);
}

void loop() {
  displayNumber();
  sevseg.refreshDisplay();
}


void displayNumber() {
  char customKey = customKeypad.getKey();
  if ( strlen(keyNum) <= 4) {
    if(customKey){
      if(customKey=='*'){
        keyPress();
        clearSevDisplay();
      }
      if(customKey=='#') {
        keyPress();
        checkPassword();
      }
      if (customKey=='A'){
        keyPress();
        addKey = "A";
        strcat( keyNum, addKey.c_str() );
        sevseg.setChars(keyNum);
        sevseg.refreshDisplay();
      }
      if (customKey=='B'){
        keyPress();
        addKey = "B";
        strcat( keyNum, addKey.c_str() );
        sevseg.setChars(keyNum);
        sevseg.refreshDisplay();
      }
      if (customKey=='C'){
        keyPress();
        addKey = "C";
        strcat( keyNum, addKey.c_str() );
        sevseg.setChars(keyNum);
        sevseg.refreshDisplay();
      }
      if (customKey=='D'){
        keyPress();
        addKey = "D";
        strcat( keyNum, addKey.c_str() );
        sevseg.setChars(keyNum);
        sevseg.refreshDisplay();
      }
      if (customKey=='1'){
        keyPress();
        addKey = "1";
        strcat( keyNum, addKey.c_str() );
        sevseg.setChars(keyNum);
        sevseg.refreshDisplay();
      }
      if (customKey=='2'){
        keyPress();
        addKey = "2";
        strcat( keyNum, addKey.c_str() );
        sevseg.setChars(keyNum);
        sevseg.refreshDisplay();
      }
      if (customKey=='3'){
        keyPress();
        addKey = "3";
        strcat( keyNum, addKey.c_str() );
        sevseg.setChars(keyNum);
        sevseg.refreshDisplay();
      }
      if (customKey=='4'){
        keyPress();
        addKey = "4";
        strcat( keyNum, addKey.c_str() );
        sevseg.setChars(keyNum);
        sevseg.refreshDisplay();
      }
      if (customKey=='5'){
        keyPress();
        addKey = "5";
        strcat( keyNum, addKey.c_str() );
        sevseg.setChars(keyNum);
        sevseg.refreshDisplay();
      }
      if (customKey=='6'){
        keyPress();
        addKey = "6";
        strcat( keyNum, addKey.c_str() );
        sevseg.setChars(keyNum);
        sevseg.refreshDisplay();
      }
      if (customKey=='7'){
        keyPress();
        addKey = "7";
        strcat( keyNum, addKey.c_str() );
        sevseg.setChars(keyNum);
        sevseg.refreshDisplay();
      }
      if (customKey=='8'){
        keyPress();
        addKey = "8";
        strcat( keyNum, addKey.c_str() );
        sevseg.setChars(keyNum);
        sevseg.refreshDisplay();
      }
      if (customKey=='9'){
        keyPress();
        addKey = "9";
        strcat( keyNum, addKey.c_str() );
        sevseg.setChars(keyNum);
        sevseg.refreshDisplay();
      }
      if (customKey=='0'){
        keyPress();
        addKey = "0";
        strcat( keyNum, addKey.c_str() );
        sevseg.setChars(keyNum);
        sevseg.refreshDisplay();
      }
    }
  }
  else {
    checkPassword();
  }
}

void clearSevDisplay() {
  //return to lock position
  myservo.write(0);
  delay(500);

  memset(keyNum, 0, sizeof(keyNum));
  sevseg.setChars("----");
  sevseg.refreshDisplay();
}

void keyPress() {
  tone(buzz,500);
  delay(50);
  noTone(buzz);
}

void checkPassword(){
  if ( strcmp(keyNum, setPassword) == 0 ) {
    //you're in!
    validBuzz();

    //move to unlocked position
    for (int pos=0;pos<=180;pos+=5)
    {
      myservo.write(pos);
      delay(5);
    }
    delay(openSeconds);

    clearSevDisplay();
  }
  else {
    //wrong password!
    invalidBuzz();
    clearSevDisplay();
  }
}

void validBuzz() {
  tone(buzz,1000);
  delay(1000);
  noTone(buzz);
}

void invalidBuzz(){
  tone(buzz,1500);
  delay(1500);
  noTone(buzz);
}
Code Breakdown:
- setup()
This is a default Arduino function. In this function, the code for SevSegShift library setup for one 74HC595 shift register is used. Be sure to set the hardwareConfig to COMMON_ANODE before playing with the other settings.
This function also enables the servo by using the command myservo.attach(pin #). The function clearSevDisplay() is then called to prepare the display for input.
- loop()
This is also a default Arduino function. Any commands set here will be executed indefinitely. This function calls on the displayNumber() function with the refreshDisplay() of the SevSegShift library.
The refreshDisplay() is needed to make sure that the seven segment will properly display the character array keynum and the placeholder ----.
- keyPress()
- checkPassword()
This function is called the moment the key # is pressed or if keyNum character array has more than four characters (meaning, consecutive four keys have been pressed).
It utilizes the strcmp (char 1, char2) == 0 command for identifying if the input characters are the same as the assigned password in the setPassword character array.
Once it identifies that the characters are the same (meaning the password is CORRECT), it calls on validBuzz() and moves the servo to it's full rotation of 180 degress to its unlocked position (simulating the movement of a door being opened). It allows the door to stay open for 10 seconds more. This number could be changed in the openSeconds variable before setup().
Afterwards, the servo resets back to original position and the 4-digit display tube will return back to placeholder text when it calls on the clearSevDisplay() function.
However, if it detects that the user-input characters and the assigned password are not the same, it calls on invalidBuzz() and clearSevDisplay().
- displayNumber()
This function is called in order to read the keypad input and display the character array keynum in the 4-digit display. It is also enclosed in an if-else statement that allows it to check if keynum only has four or less characters. If the system finds that it has more than four characters, it will call on the function checkPassword().
- clearSevDisplay()
This function is called in order to make sure that the servo is reset to lock position or angle 0 degrees. It also makes sure that the character array keyNum is empty by using the command memset( char1, 0, sizeof(char1) ) and resets the display to the placeholder text.
- validBuzz()
This function is called when the user inputs a correct password. This part could be changed accordingly.
- invalidBuzz()
This function is called when the user inputs an incorrect password. This part could be changed accordingly.
Video Demo:
Conclusion:
This project shows the idea of combining different individual components and modules that could be found in the Arduino Upgraded Starter Kit and turning them into something that could be used for general security application like password-based door lock.
To find more useful projects, continue reading the Knowledgebase and Tutorials.
References:
https://how2electronics.com/password-based-security-system-arduino-keypad/


